March 19, 2024

Top 5 Tips for Growing Romaine Lettuce

Romaine lettuce is one of the most popular of all the four lettuce types. With a crisp head, loose leaf and butter head, Romaine lettuce is one of the hardiest salads. It can withstand both hot and cool climates.

The lettuce even tastes better when taken fresh from the garden. So it makes sense growing some in your garden. The good news is that growing romaine lettuce is easy.

In the post, I will share some important tips for growing Romaine lettuce.

Plant Romaine Lettuce in Cool Season

Romaine lettuce loves cool temperatures between 45 to 75 degrees F. It grows well in cool temperatures. But it can also tolerate some heat unlike other types of lettuce.

The best time to grow is the fall and spring. In spring, wait until all the frost has gone. Hot temperatures affect the plant’s flavor.

When temperatures are too hot outside, romaine lettuce will produce a milky substance. The substance will not harm you, but will affect how romaine lettuce tastes.

When conditions are not optimal for growth, you’ll notice changes in the plant’s shape. Changes in shape occur because the plant is bolting and only focussing on seed production.

Apply Lettuce Companion Plants

Lettuce companion plants are plants that are known to have a positive effect on the growth and health of lettuce. You need to plant them in the same garden bed. Some common lettuce companion plants include:

Radishes: Radishes are fast-growing plants that can be harvested in as little as 25 days. They also have a deep root system that helps to loosen the soil, making it easier for lettuce roots to penetrate and absorb nutrients.

Carrots: Carrots and lettuce have a mutually beneficial relationship. Lettuce provides shade for the carrots, helping to keep them cool in the hot summer sun. Carrots, in turn, help to improve soil structure and reduce the risk of pests and diseases.

Onions: Onions have a strong scent that can help to repel pests that might otherwise damage lettuce plants. They also have a deep root system that helps to improve soil structure and fertility.

Beets: Beets are another fast-growing plant that can be harvested in as little as 35 days. They also have a deep root system that helps to loosen the soil and improve drainage.

By planting these companion plants alongside romaine lettuce, you can help to improve the health and growth of your lettuce plants while also increasing the diversity and productivity of your garden

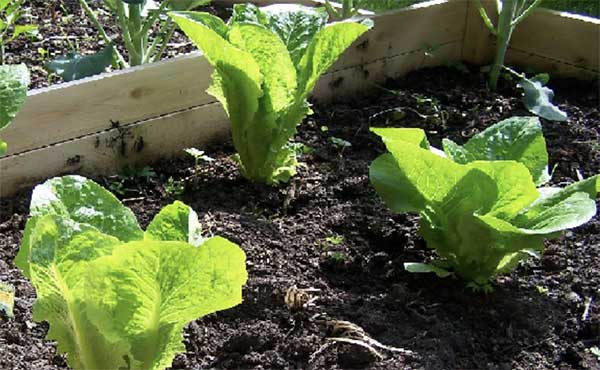
Ensure Proper Lettuce Spacing

Proper romaine lettuce spacing is important for several reasons. First, it helps to ensure that the lettuce plants have enough room to grow and develop properly. If the romaine lettuce are too close together, they may compete for resources such as sunlight, water, and nutrients, which can lead to poor growth and yield.

In addition, proper lettuce spacing can help to improve air circulation and reduce the risk of fungal diseases. By providing adequate space between lettuce plants, you can help to promote better air flow, which can help to prevent the spread of diseases.

Finally, proper lettuce spacing can also help to improve the overall appearance of your lettuce bed or garden. Lettuce plants that are spaced too closely together may become crowded and unsightly, while plants that are spaced too far apart may look sparse and unbalanced. By paying attention to the spacing of your lettuce plants, you can create a more attractive and functional garden or bed.

Grow Romaine Lettuce in Nutrient-rich Soil

Rich nutrient soil is crucial for high romaine lettuce yields. You can make soil nutrient rich by creating a sandy loam soil mix. Romaine lettuce can also be grown in 100% compost. Such composts are usually nutrient rich.

Adding compost or well-rotted manure to soil helps improve its structure and fertility. Romaine lettuce prefers a well-draining soil with a pH between 6.0 and 6.8. You can also help fertilize the plant after every 2-4 weeks with a liquid fertilizer.

Harvest When Leaves are Crisp and Mature

The best time to harvest romaine lettuce depends on the variety and the growing conditions. In general, romaine lettuce is ready to harvest when the leaves are crisp and the plant has reached its mature size. You can test the readiness of the lettuce by gently pulling on a leaf. If it comes off easily, the lettuce is ready to be harvested.

If you are growing romaine lettuce in a cool climate, it may be ready to harvest in about 60-75 days after planting. In warmer climates, it may be ready to harvest in as little as 45 days.

It is generally best to harvest romaine lettuce in the morning when the leaves are crisp and cool. Avoid harvesting romaine lettuce in the heat of the day, as this can cause the leaves to wilt.

To harvest the lettuce, use a sharp knife or scissors to cut the outer leaves close to the base of the plant. Avoid damaging the inner leaves, as these will continue to grow and produce more lettuce. 

You can also harvest the entire plant by cutting it off at the base, leaving about an inch or two of the plant in the ground. This will allow the plant to regrow and produce a second crop of lettuce.

For the full details of growing romaine lettuce step by step, I learned a lot from this great source and recommend you to follow: https://backyardgardenersnetwork.org/how-to-grow-romaine-lettuce/.

Inexpensive Lighting Idea – I Want There in the Patio Area Just Outside the Barn

Inexpensive lighting idea – I want there in the patio area just outside the barn

If you’re looking for a DIY lighting idea for your porch, we’ve got you covered! From string lights to lantern jars, you can create a beautiful mood outdoors without breaking the bank.

Below, we share 5 inexpensive lighting ideas for any outdoor area.

#1 Bulky String Lights

Whether you have an ocean view to highlight or just want to add a simple lighting solution to oversee your backyard, string lights should be your go-to. You can hang these between trees, affix them to a wall, or suspend them from poles. It’s an easy DIY project that’s budget-friendly and will make a huge difference. 

#2 Fairy Lights

Fairy lights are a popular choice, and they’re available in an assortment of styles. You can purchase them as strings or curtains. There are also many colors to choose from. Whether you hang them from your roof or wrap them around poles or trees, they’ll brighten your backyard and make your porch area feel magical!

#3 Paper Ball Lights

If you want a natural or beachy vibe, consider using paper ball lights. These are more affordable than classic ball lights and make a wonderful addition to bohemian aesthetics. If you add some pillows and ottomans to your porch, your look will be complete!

#4 Glass Jars With Candles

You don’t have to spend money on lights that need electricity or batteries. If you like a vintage feel, using glass jars and candles will do the trick. You can use any type of jar and place a candle of any size in them. Bigger jars and candles will provide more light. Simply place them around your porch or hang them with a sturdy rope. 

#5 Solar Lights

If you have access to full sun during the day, solar lights are a great option. There are many to choose from, and all they require is sunlight to charge fully. They’ll stay on all night, and you can even set a timer with most. If you don’t like traditional lighting options, opt for solar flower lights. These make a unique addition to any backyard!

Reasons To Light Up Your Porch Area

Placing lights outdoors can make the area feel cozier. You don’t need to use spotlights that’ll allow neighbors to see your every move. Subtle lighting can ensure you don’t bump into friends when walking around and keep the rest of your doings private. 

Summary

Putting up lights in your backyard doesn’t need to empty your pocket. With affordable and DIY ideas, you can transform your garden and porch area. It doesn’t take much time either! Once you have everything you need, you can get your desired setup done in an hour or two.

If you opt for our DIY glass jar option, ask community groups for free unused glass containers. There’ll be plenty of people willing to donate these!

I hope you enjoyed this article and found the ideas helpful. If you have more questions about lighting your outdoor area, ask them in the comments.

Read other DIY project here.

Set up beside porch to the right..Make pumpkins with plywood. Buy plant hanger.

Set up beside porch to the right..Make pumpkins with plywood. Buy plant hanger.

Creating a fall garden decoration is easy if you have the right props on hand. There are many different things you can use, but not all will be available to you. Luckily, we’ve compiled a list of things to choose from!

Below we share the 5 most common items you can use to create a stunning fall garden setup. We also share a few ideas for each.

What You’ll Need?

#1 Real Pumpkins

Growing pumpkins will give you access to fall garden props without much work! You can add them to your DIY setup and use them afterward. Real pumpkins are one of the best items to use in a fall garden setup. Not only do they make a realistic prop, but they can also be used as is or carved, so your creative options are endless!

#2 Plywood – Make Wood Pumpkin

Plywood is extremely versatile. You can use these thin sheets to create a number of props if you have the right cutting machine and templates. All they’ll need is some paint for the finishing touches! 

#3 Dried Leaves

Don’t throw your fallen leaves away this season! You can collect bags full of it to use in your garden set up for fall. While there will already be plenty laying around, dumping a bag full of leaves in one place will create a fuller look and make your fall setup better. If you have little kids around, make leave piles for them to play in. 

#4 Cardboard Props

Cardboard is the most versatile craft item. You can create jack-o-lanterns, fall leaves, and even spooky props to make your fall garden come alive. You can buy cardboard in any color imaginable and cut it by hand or use a craft machine. Pinterest and craft groups have many ideas to make creating props even easier!

#5 Flowers

Flowers can play a big role in your fall garden. These will add life, brighten the mood, and make a great thank-you gift if you have guests over. Place the flowers in little pots all over your garden or set up crates or a wheelbarrow to display them. 

Great flower choices for a fall garden setup include the african daisy, blanket flower, bidens, canna lily, fossflower, garden mums, and calibrachoa.

How To Create?

Once you have all your items on hand, you might be wondering how to best use them. Here are some great ideas!

  • Use an old wheelbarrow to create a flower display. You can fill it with any flowers of your choice and place a real pumpkin by its wheels. Sprinkle fall leaves around this setup for an added touch!
  • Make pumpkin cutouts from plywood in different sizes. You can paint them hues of orange, red and yellow. Place them near a tree and add potted flowers as well. 
  • Create hanging jack-o-lanterns, pumpkins, flowers, or even spiders from cardboard. Hang them from your trees, poles, or roof. You can also stick them to walls. 

In Ending

You can make a stunning fall garden display without breaking the bank. You don’t have to call in a designer either! With a little creativity and DIY supplies, your garden will make heads turn. If you feel like doing something a little extra, make cardboard flowers to hand out to party guests. They’ll remember this gesture forever!

I hope this article gave you great ideas. If you try any of them or have other questions, let me know in the comment section.

Read other DIY project here.

Flowers Fill a Vintage Wooden Crate | Delphiniums with Viburnum, Stocks, Euphorbia, Sweet Williams and British-Grown Foliages | New Covent Garden Market More

If you’re looking for a unique, handmade gift for your mom, sister, or colleague, a flower crate might be perfect! These are easy to make and always leave someone feeling special.

Floral arrangements are one thing, but a flower crate is next level! You can decorate the crate however you want to add a specific touch and use a wide variety of flowers. Below, I share how to make a quick floral crate and which flowers work best for it.

Create a Flower Create Gift in 5 Steps

It’s really easy to create a flower crate that you can gift to loved ones. By following these simple steps, you’ll have a beautiful handmade gift in minutes!

Step 1: Prepare Your Flowers

After choosing the flowers you’d like to use, remove all their leaves and place them in water. Ensure that only the flowerheads remain, if this is what you’re going for. If you’d like some leaves on your flowers, skip the trimming part and simply place them in water after you’ve cut them.

Step 2: Prepare Your Floral Foam

I suggest using floral foam in your crate. This will keep the flowers moist and upright. You should cut the foam to the size of the crate you’re using. Next, soak your foam in water and flower food. 

Step 3: Decorate Your Crate

If you’d like to paint your crate or add any other decor to it, now would be the time to do so. Ensure that any paint or glue is completely dried before continueing to the next step. 

Step 4: Insert the Floral Foam

By now, your floral foam should have soaked up a lot of water and fertilizer. Remove it from the water bath and place it into your crate.

Step 5: Arrange The Flowers

Insert your flowers one by one to create your desired look. You can get creative and do this in any way you want!

Flowers That Work Best for a Floral Crate

You can use any flowers you want to create a floral crate gift. Some great options include:

  • Roses
  • Stocks
  • Sweet Williams
  • Petunias
  • Zinnias
  • Begonias
  • Euphorbia
  • Ivy
  • Vinca
  • Heather

Flower Create Lifespan: Your gifted flower crate will last about a week, depending on how it’s cared for. If the floral foam is kept moist, the flowers are likely to live up to 12 days.

Floral Foam Lifespan: If you have leftover floral foam, you can store it for up to a year! Just keep it dry and in a cool, dark place. It can turn brown if there’s water left in it or if you place it in sunlight. 

In Ending

You can make a flower crate with store-bought flowers or ones you choose from your garden. This unique gift idea is easy to put together and doesn’t have to cost a ton of money. With a little creativity, you can create something special fo a loved one or friend. 

I hope this article inspired you! If you have more questions about floral crates, ask them in the comments.

Read my related DIY: Set up beside porch to the right..Make pumpkins with plywood. Buy plant hanger.

Check out my other work here.

Ornamental Grass and Flower Garden Idea

This is a beautiful garden with a combination of ornamental grass and flowers garden.

The grass in the picture is Pink Muhly Grass. Muhly grass is easy enough to grow that even beginners can do so! Whether you’re growing them from seed or propagated plants, your garden will look stunning in no time. These slender long grass shoots will produce pink flowers that mesmerize all and continue to look beautiful even in their dormant season.

Below we share how to grow and propagate muhly grass.

What Is Muhly Grass?

Source: https://livingboosts.com/can-pink-muhly-grass-grow-in-containers/

Muhly grass, specifically the pink type, is native to Florida. It’s widely used as a decorative perennial because of its pink appearance. This grass is resilient, and as long as you meet its conditions, it’ll adapt to any growing environment. 

How To Grow Muhly Grass?

Pink muhly grass is pretty easy to grow. The online blog Living Boosts says that it can reach heights of up to 3 feet and two to four feet wide and will add a fairy-like feel to your garden. This is how you can get the desired effect:

Soil: Choose soil that drains really well. If the soil becomes too wet, your muhly grass will die. Ensure the pH is slightly acidic and not higher than 7.0. If you have salinity in your soil, this grass will still thrive. 

Water: Muhly grass doesn’t require much water once it’s established. If you get regular rainfall, you won’t need to water this grass at all! Muhly grass is drought-tolerant thanks to its deep roots. You can get away with watering your pink muhly grass once every 3 weeks. 

Sunlight: Warm, sunny weather is ideal for this grass. It does well in dry areas and can’t tolerate harsh winter temperatures well. You can plant your muhly grass in full sun.

To plant muhly grass, start by working your garden soil in a spot that gets daily sunlight. You should create a clean area that’s about six inches deep and free of debris and rocks. Plant the grass a few feet from one another to ensure effective air circulation. The best time to plant muhly grass is in the fall.  

How To Prune Muhly Grass

Your muhly plants will benefit from some pruning just before their next growing season begins. Avoid pruning your muhly grass during the summer. This can interfere with flower production and decrease the chances of your grass getting that pink effect. When pruning, you can cut a few inches off, but don’t go too close to the plant crown. 

How To Propagate Muhly Grass

Muhly grass is relatively easy to propagate. You can do this by collecting seeds or through division. Follow these steps for the division method:

  1. Use a shovel or spade to dig around the perimeter of a single plant. Dig deep enough to free the root ball.
  2. Split the plant into a few equal parts while keeping the root ball size in mind. 
  3. Place one part of the plant back in the original hole while planting the other in a new one. 
  4. Keep both parts watered for the first two days to ensure root establishment. 

Before You Go

Muhly grass can add a unique aesthetic to your garden without requiring much work. This low-maintenance grass is easy to plant and propagate, so you’ll have tons of it before the next growing season. You don’t have to water your muhly grass often and can simply ensure it has a sunny spot to grow in. 

I hope this article was helpful! If you decide to grow muhly grass, come back to share your experience in the comments.

Don’t forget to check out the home page for more gardening DIY projects.